
My son, Max, is a big fan of minecraft and mathmatics. He asked me to build a mathmatics game for him. I decided to use C#, .net core, React-Three-Fiber with TypeScript and TailwindCSS to build a 3D web app. Here is briefly how I did it.
Init the Azure cli
- Install the Azure CLI by running the following command in the terminal.
brew install azure-cli
If there is an error about Python, you can run xcode-select --install to install the requirements.
- Login to the Azure by running the following command in the terminal.
az login
3.Dertermine the architecture of the project. I decided to use the following architecture.
1. Azure App Service + Azure SQL Database
2. Github actions + CI/CD
Init the Backend project
- Download .NET 8.0 SDK (v8.0.300) - macOS x64 and install.
- Verify the installation by running the following command in the terminal.
dotnet
- Open Visual Studio Code and install the C# extension.
- Create a new project by running the following command in the terminal. At the same time, add NuGet supports.
dotnet new install Clean.Architecture.Solution.Template::8.0.5
dotnet new ca-sln -cf React -o MaxMath
cd src/Web
This template is a very good DDD and CQRS template. It has the following abilities:
.net core 8
EF core 8
React 18
MediatR: is a lightweight library in .NET that implements the mediator pattern, facilitating in-process messaging with no dependencies. By using Mediator with CQRS, you can achieve a cleaner architecture where commands are handled separately from queries, leading to a more maintainable and scalable system. Here is a good article about MediatR. https://codewithmukesh.com/blog/cqrs-and-mediatr-in-aspnet-core/
AutoMapper: is a library to map one object to another. It is very useful when you need to map the domain object to the DTO object.
FluentValidation: is a library to validate the object.
- Because this template is based on the localDB, I need to change to use the docker sql server. I use the following command to run a docker and change the connection string.
sudo docker pull mcr.microsoft.com/mssql/server:2022-latest
sudo docker run -e "ACCEPT_EULA=Y" -e "SA_PASSWORD=Password123" -p 1433:1433 --name sqlserver -d mcr.microsoft.com/mssql/server:2022-latest
Download Azure Data Studio and connect to the sql server. Create a new database called MaxMath. Change the connection string in the appsettings.json file.
"DefaultConnection": "Server=127.0.0.1;Database=MaxMathDb;User Id=sa;Password=Password123;MultipleActiveResultSets=true;Persist Security Info=False;Encrypt=False"
Then you can run the project and visit the project at https://localhost:44447/.
cd src/Web
dotnet run
The structure of this project looks like this:
src/Application -- Core part: business logic and types, only be used in this system.
src/Domain -- Core part: enterprise logic and types, shared across different systems.
src/Infrastructure -- data access logic will be implemented here, but interface may be in Domain or Application.
src/Web/ClientApp -- React project is here.
Init the Frontend project
I want to use the lastest components and libraries, so I decided to use the following things:
- Typescript
- React-Three-Fiber/Drei
- TailwindCSS
- Vite
- React
- Zustand/Redux
After successfully generate the frontend project, I will replace the frontend project in the template project.
First, I need to init the project with Vite. I use the following command to init the project.
nvm ls
nvm use 20.5.0
npm create vite@latest minemath -- --template react-ts
cd minemath
npm install -D tailwindcss postcss autoprefixer
npm install three @react-three/fiber
npm install @react-three/drei
npm install zustand redux
By the way, Zustand and Redux are both state management libraries. I want to use both of them to manage the state of the project. I will use Zustand to manage the state of the 3D world and use Redux to manage the state of the UI.
Then I need to init the tailwindcss. I use the following command to init the tailwindcss.
npx tailwindcss init -p
Then I need to add the following code to the tailwind.config.js.
  content: [
    "./index.html",
    "./src/**/*.{js,ts,jsx,tsx}",
  ]
Add the following code to the index.css.
@tailwind base;
@tailwind components;
@tailwind utilities;
Now, the project is ready to use.
npm run dev
You can visit the project at http://localhost:5173/ now.
Test the 3D world
Use the below code to test the 3D world. Modify the App.tsx file to the following code.
import './App.css'
import {Canvas, useFrame} from "@react-three/fiber";
import {Sky, OrbitControls} from "@react-three/drei";
import { useRef, useState } from 'react'
import * as THREE from 'three';

type BoxProps = {
  position: [number, number, number];
};

const Box = (props: BoxProps) => {
    // This reference gives us direct access to the THREE.Mesh object

    const ref = useRef<THREE.Mesh>(null)
    // Hold state for hovered and clicked events
    const [hovered, hover] = useState(false)
    const [clicked, click] = useState(false)
    // Subscribe this component to the render-loop, rotate the mesh every frame
    useFrame((_, delta) => {
      if (ref.current) {
        (ref.current as THREE.Mesh).rotation.x += delta
      }
    })
    // Return the view, these are regular Threejs elements expressed in JSX
    return (
      <mesh
        {...props}
        ref={ref}
        scale={clicked ? 1.5 : 1}
        onClick={() => click(!clicked)}
        onPointerOver={(event) => (event.stopPropagation(), hover(true))}
        onPointerOut={() => hover(false)}>
        <boxGeometry args={[1, 1, 1]} />
        <meshStandardMaterial color={hovered ? 'hotpink' : 'orange'} />
      </mesh>
    )

}
const App = () => {
  return (
// tailwind css usage
    <div className={' bg-white absolute w-full h-screen p-0 top-0 left-0'}>
      <div className={'h-5/6 p-0 '}>
    <Canvas>
      <ambientLight intensity={Math.PI / 2} />
      <spotLight position={[10, 10, 10]} angle={0.15} penumbra={1} decay={0} intensity={Math.PI} />
      <pointLight position={[-10, -10, -10]} decay={0} intensity={Math.PI} />
      <Sky />
      <Box position={[-1.2, 0, 0]} />
      <Box position={[1.2, 0, 0]} />
      <OrbitControls />
    </Canvas>
        <div className={"bg-slate-800 text-white text-current text-7xl italic font-light z-40 p-5"}>MAX's maths</div>
      </div>
    </div>
  )
}

export default App
Now, you can see the 3D world in the browser. You can use the mouse to rotate the 3D world. You can also click the box to enlarge it.
It looks like this:

Add the Router
The game will have multiple pages. I need to add the router to the project. I use the following command to add the router.
npm install react-router-dom localforage match-sorter sort-by
Then I need to modify the App.tsx file to the following code.
import './App.css'
import type { LoaderFunctionArgs } from "react-router-dom";
import {
  Form,
  Outlet,
  RouterProvider,
  createBrowserRouter,
  redirect,
  useActionData,
  useFetcher,
  useLocation,
  useNavigation,
  useRouteLoaderData,
} from "react-router-dom";
import { fakeAuthProvider } from "./auth.ts";
import Grass from './models/assets/grass.jpg'
import Guide from './models/assets/guide.jpg'
import Level1 from './Level1.tsx';

const router = createBrowserRouter([
  {
    id: "root",
    path: "/",
    loader() {
      // Our root route always provides the user, if logged in
      return { user: fakeAuthProvider.username };
    },
    Component: Layout,
    children: [
      {
        index: true,
        // path: "login",
        action: loginAction,
        Component: LoginPage,
      },
    ],
  },
  {
    path: "/logout",
    async action() {
      // We signout in a "resource route" that we can hit from a fetcher.Form
      await fakeAuthProvider.signout();
      return redirect("/");
    },
  },
  {
    path: "Level1",
    loader: protectedLoader,
    Component: Level1,
  },
]);

export default function App() {
  return (
    <RouterProvider router={router} fallbackElement={<p>Initial Load...</p>} />
  );
}

function Layout() {
  return (
    <div>
      <div style={{ backgroundImage: `url(${Grass})` }} className={'fixed bg-cover w-full h-screen p-0 top-0 left-0'}>
      <h1 className="text-white text-3xl font-bold m-8">MAX's MineMaths V0.1 2024</h1>
      <div className="bg-green-500 p-4 rounded-lg flex flex-col md:flex-row items-center">
        <div className="w-1/2 ml-4">
          <img src={Guide} alt="Game Demo" className="w-80 m-12 rounded-lg" />
        </div>
        <div className="md:w-1/2 text-left text-xl">
          <p className="text-white mb-4">How to play:</p>
          <ul className="text-white list-disc list-inside mb-4">
            <li>First, you click the screen so now you can see around.</li>
            <li>Then you use W, A, S, and D or the arrow keys and the blank key to jump and move around.</li>
            <li>Use p to switch to the pickaxe and h to switch to the hammer.</li>
          </ul>
            <Outlet />
            <AuthStatus />

        </div>
      </div>


      </div>
    </div>
  );
}

function AuthStatus() {
  // Get our logged in user, if they exist, from the root route loader data
  const { user } = useRouteLoaderData("root") as { user: string | null };
  const fetcher = useFetcher();

  if (!user) {
    return <p></p>;
  }

  const isLoggingOut = fetcher.formData != null;

  return (
    <div>
      <p>Welcome {user}!</p>
      <fetcher.Form method="post" action="/logout">
        <button type="submit" disabled={isLoggingOut}>
          {isLoggingOut ? "Signing out..." : "Sign out"}
        </button>
      </fetcher.Form>
    </div>
  );
}

async function loginAction({ request }: LoaderFunctionArgs) {
  const formData = await request.formData();
  const username = formData.get("username") as string | null;

  // Validate our form inputs and return validation errors via useActionData()
  if (!username) {
    return {
      error: "You must provide a username to log in",
    };
  }

  // Sign in and redirect to the proper destination if successful.
  try {
    await fakeAuthProvider.signin(username);
  } catch (error) {
    // Unused as of now but this is how you would handle invalid
    // username/password combinations - just like validating the inputs
    // above
    return {
      error: "Invalid login attempt",
    };
  }

  const redirectTo = formData.get("redirectTo") as string | null;
  return redirect(redirectTo !='/' ? redirectTo! : "/Level1");
}

function LoginPage() {
  const location = useLocation();
  const params = new URLSearchParams(location.search);
  const from = params.get("from") || "/";

  const navigation = useNavigation();
  const isLoggingIn = navigation.formData?.get("username") != null;

  const actionData = useActionData() as { error: string } | undefined;

  const { user } = useRouteLoaderData("root") as { user: string | null };

  if (user) {
    return ''
  }

  return (
    <div className='p-4'>
      <p>Please choose your class and input your name!</p>
      <Form method="post" replace>
        <input type="hidden" name="redirectTo" value={from} />
        <label><GradeSelect/></label>

        <label className='p-4'>
          Username: <input name="username" className='p-auto text-black w-60 rounded-md'/>
        </label>{" "}
        <button type="submit" className='w-full flex items-center justify-center m-4 border border-transparent text-base font-medium rounded-md text-white bg-blue-600 hover:bg-blue-700 focus:outline-none focus:ring-2 focus:ring-offset-2 focus:ring-blue-500' disabled={isLoggingIn}>
          {isLoggingIn ? "Logging in..." : "Login"}
        </button>
        {actionData && actionData.error ? (
          <p style={{ color: "red" }}>{actionData.error}</p>
        ) : null}
      </Form>
    </div>
  );
}

function protectedLoader({ request }: LoaderFunctionArgs) {
  if (!fakeAuthProvider.isAuthenticated) {
    const params = new URLSearchParams();
    params.set("from", new URL(request.url).pathname);
    return redirect("/?" + params.toString());
  }
  return null;
}

const GradeSelect = () => {
  return (
    <div className="flex p-4">Class:
    <select className="block w-60 text-black border border-gray-300 rounded-md shadow-sm focus:outline-none focus:ring-blue-500 focus:border-blue-500">
      <option value="year1">Year 1</option>
      <option value="year2">Year 2</option>
      <option value="year3">Year 3</option>
      <option value="year4">Year 4</option>
      <option value="year5">Year 5</option>
      <option value="year6">Year 6</option>
      <option value="year7">Year 7</option>
      <option value="year8">Year 8</option>
    </select>
    </div>
  );
};
Now, you can see the router in the browser. You can click the "Login" button to login. After login, you will be redirected to the Level1 page.
The project structure looks like this:
src/
├── App.css
├── App.tsx
├── auth.ts
├── components
│   ├── GradeSelect.tsx
│   └── Layout.tsx
├── images
│   ├── assets
│   │   ├── grass.jpg
│   │   └── guide.jpg
│   └── post
This is the main structure of the project. You can add more pages and components to the project as you like. Then we need to move all the client side code to the src/Web/ClientApp folder. The final structure of the project looks like this:
src/
├── Application
├── Domain
├── Infrastructure
├── Web
│   ├── ClientApp
│   │   ├── public
│   │   ├── src
│   │   │   ├── App.css
│   │   │   ├── App.tsx
│   │   │   ├── auth.ts
│   │   │   ├── components
│   │   │   │   ├── GradeSelect.tsx
│   │   │   │   └── Layout.tsx
│   │   │   ├── images
│   │   │   │   ├── assets
│   │   │   │   │   ├── grass.jpg
│   │   │   │   │   └── guide.jpg
│   │   │   │   └── post
│   │   │   ├── Level1.tsx
│   │   │   ├── main.tsx
│   │   │   ├── models
│   │   │   │   └── assets
│   │   │   │       ├── grass.jpg
│   │   │   │       └── guide.jpg
│   │   │   ├── styles
│   │   │   │   └── index.css
│   │   │   └── vite-env.d.ts
│   │   ├── index.html
│   │   ├── package.json
│   │   ├── tailwind.config.js
│   │   ├── tsconfig.json
│   │   └── vite.config.ts
│   └── Program.cs
├── MaxMath.sln
└── MaxMath.csproj
Advanced 3D world
You can add more 3D models and features to the 3D world. For example, you can add a player model, a terrain model, and a skybox. You can also add more features like collision detection, physics, and animations. You can use the following code to add a player model and a terrain model.
import * as THREE from 'three'
import { useGLTF } from '@react-three/drei'
import { GLTF } from 'three-stdlib'
import MarkURL from './assets/mark.glb?url'
import { useRef } from "react";
import { useFrame } from "@react-three/fiber";

type GLTFResult = GLTF & {
  nodes: {
    ['Box005_09_-_Default_0']: THREE.Mesh
    ['Box005_03_-_Default_0']: THREE.Mesh
    ['Box005_02_-_Default_0']: THREE.Mesh
  }
  materials: {
    ['09_-_Default']: THREE.MeshStandardMaterial
    ['03_-_Default']: THREE.MeshStandardMaterial
    ['02_-_Default']: THREE.MeshStandardMaterial
  }
 }

export default function Mark(props: JSX.IntrinsicElements['group']) {
  const { nodes, materials } = useGLTF(MarkURL) as GLTFResult
  const mark = useRef<THREE.Group>(null)
  useFrame(() => {
    if (mark.current) {
      // mark.current.rotation.x += 0.01;
      mark.current.rotation.y += 0.01;
    }
  })
  return (
    <group {...props} dispose={null}>
      <group ref={mark} position={[-35.116, 760.384, -5.424]} scale={[-1, 1, 372.566]}>
        <group position={[219.915, 0, 0.481]}>
          <mesh geometry={nodes['Box005_09_-_Default_0'].geometry} material={materials['09_-_Default']} />
          <mesh geometry={nodes['Box005_03_-_Default_0'].geometry} material={materials['03_-_Default']} />
          <mesh geometry={nodes['Box005_02_-_Default_0'].geometry} material={materials['02_-_Default']} />
        </group>
      </group>
    </group>
  )
}

useGLTF.preload(MarkURL)
GLB Model
GLB (GL Transmission Format) is a file format for transmitting 3D models. It is a binary format that is designed to be efficient and easy to use. You can use GLB models in your 3D web app to create 3D models and animations. You can find many free GLB models on the internet. For example, you can find some free GLB models on the following websites:
- https://sketchfab.com/
- https://www.cgtrader.com/free-3d-models You can use the GLB model to create a 3D model in the 3D world. Some useful tools to convert GLB modles to typeScript code are: https://github.com/pmndrs/gltfjsx
P.S.
I originally planned to deploy the project to Azure App Service, but I found that the Azure App Service has a limit resouce for me. So I decide to keep it as a static project in Vercel or somewhere.
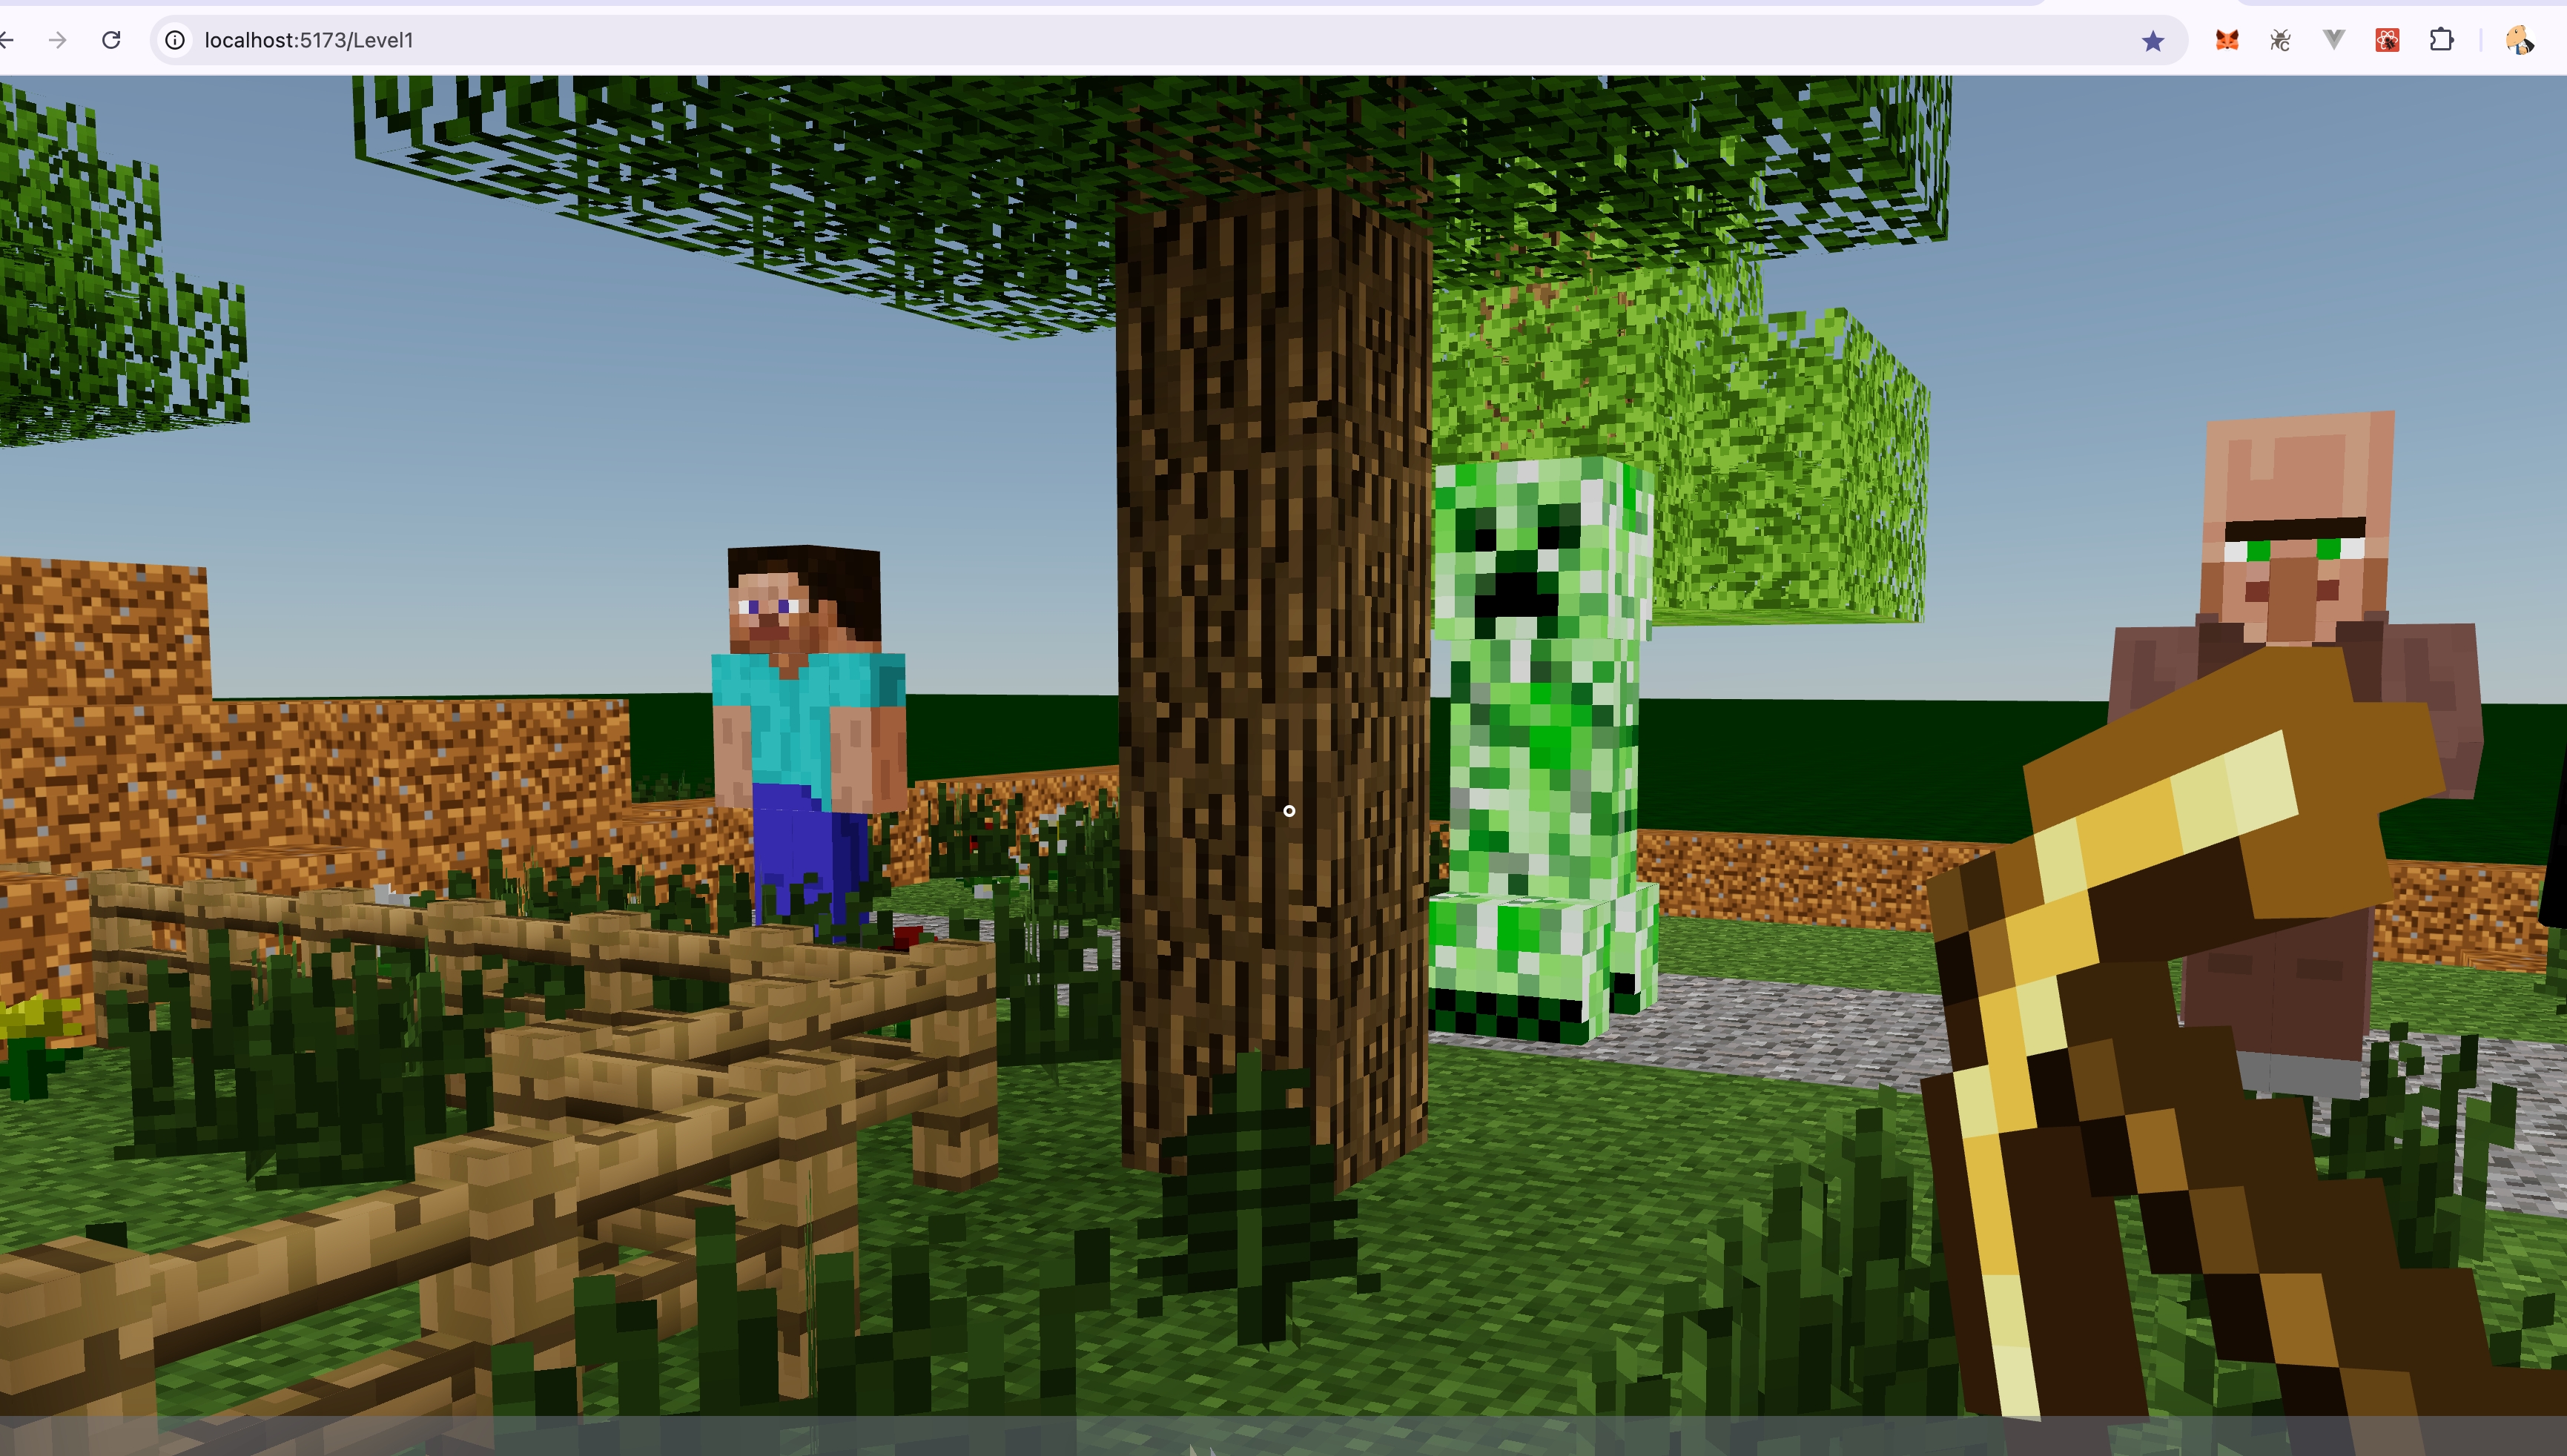
After all the work, show time!
Resources